")
If you are new to metalwork then the blacksmithing tools list for getting started can feel confusing at first. You may wonder what you really need and what you can skip. That is the hard part for most beginners. They see big forges. Heavy anvils. Many hammer types. Then they do not know where to begin. This guide makes it simple. You will learn the blacksmithing tools list for getting started in a clear order.
You will also see what belongs in a smart home shop. What belongs in a starter kit. And what you should buy later after you learn the basics. Current beginner guides and starter kit pages keep pointing new smiths to the same core tools. Forge. Anvil. Hammer. Tongs. Vise. Punches. Chisels. Safety gear. That is the real starting point.
What a beginner setup should do
A good beginner setup has one job. It should help you heat metal. Hold metal. Shape metal. And cool metal safely. That is why most trusted beginner lists keep returning to the same base tools. Blacksmithing is not about owning everything at once. It is about owning the right tools in the right order. A simple setup also helps you learn faster because you spend less time fighting your tools and more time learning the craft.
The best blacksmithing tools list for getting started focuses on tools that solve real beginner problems. You need heat. You need a solid surface. You need a way to grip hot stock. You need a hammer that feels right in your hand. You also need a safe place to quench hot steel and a way to lock work down when it must stay still. That is why starter kits and shop guides keep mentioning the same essentials.
Blacksmithing tools list for getting started
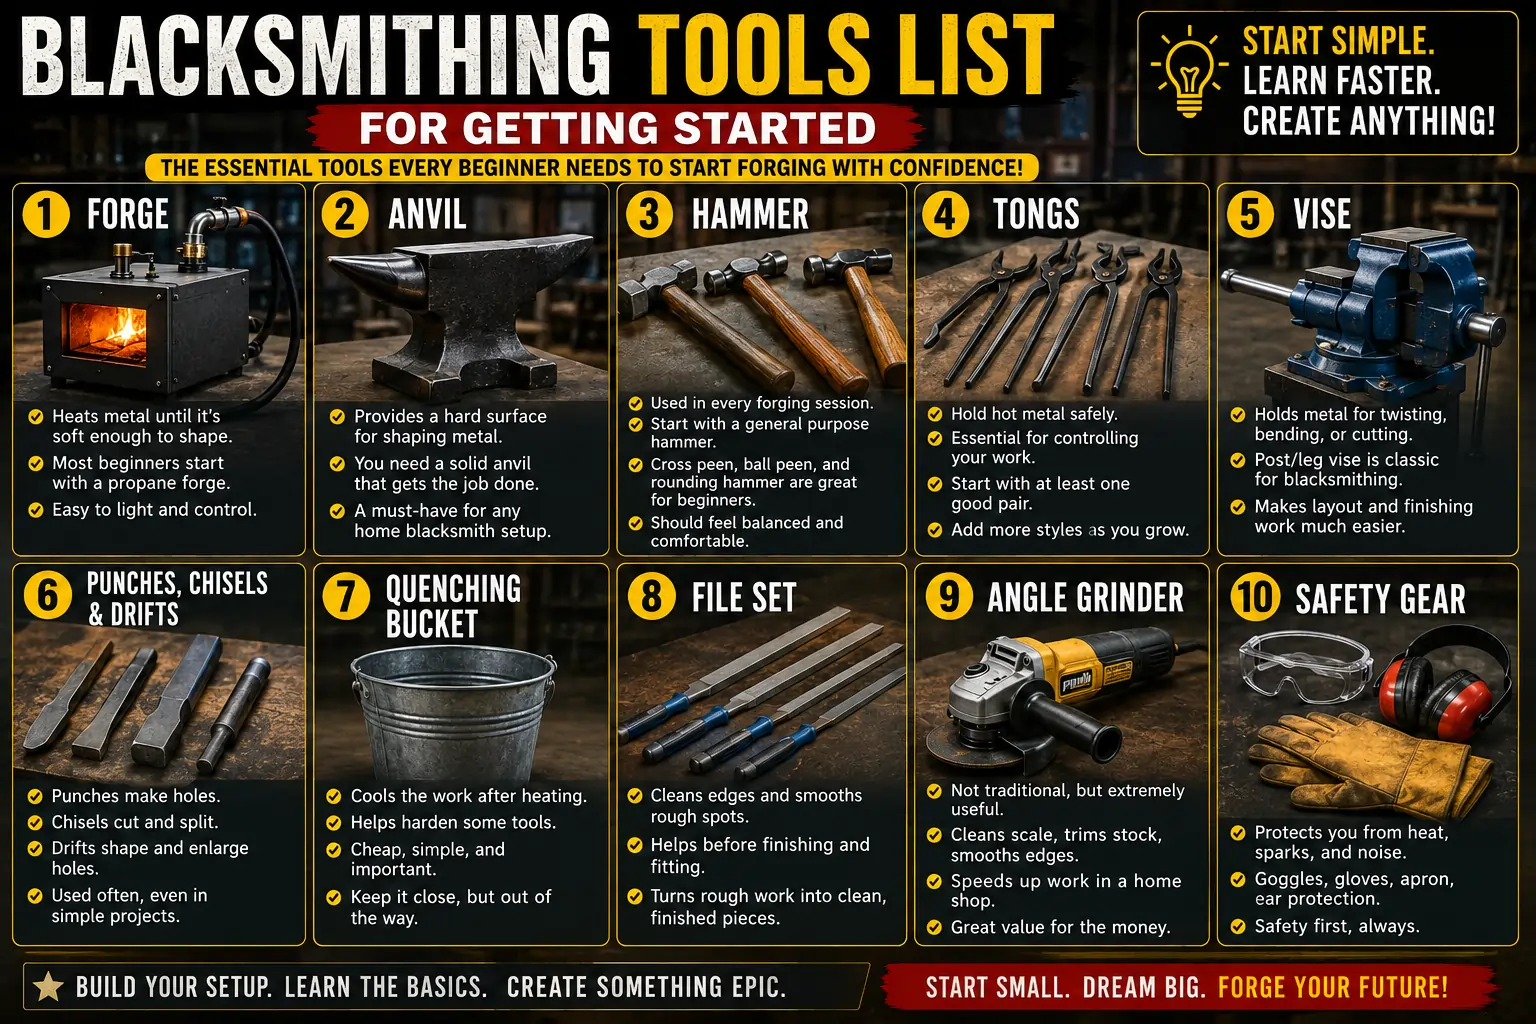
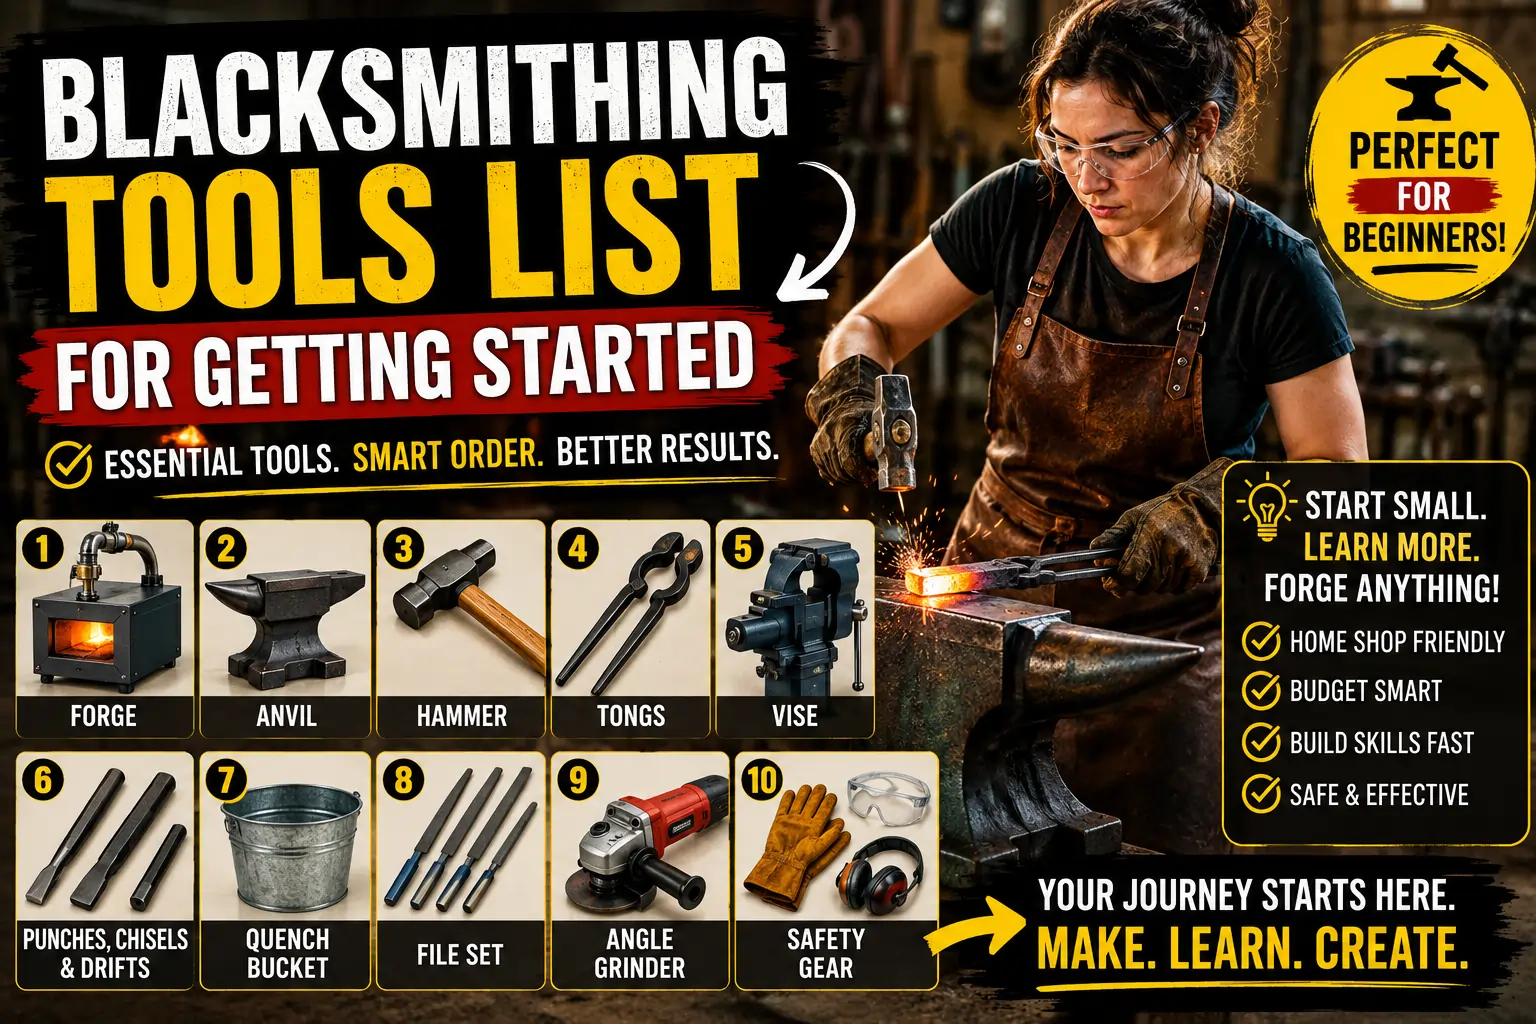
Forge
The forge is the heart of the shop. It heats the metal until it becomes soft enough to move. That is the first tool most beginners need because no heat means no forging. Trusted supplier pages and beginner guides both put the forge near the top of every starter list. Many new smiths start with a propane forge because it is simple to light and easy to control. That is also why search results for beginner blacksmith tools often lead to forge starter kits.
Anvil
The anvil gives you a hard surface for shaping metal. It supports the work while you hammer it into form. You do not need a giant showpiece anvil on day one. You need a solid one that does the job well. Beginner setup guides and tool lists still treat the anvil as one of the main must have items for a home blacksmith setup.
Hammer
A forging hammer is the tool you will use every session. Most beginners start with one general purpose hammer before buying special shapes. Common beginner choices include the cross peen hammer. Ball peen hammer. And rounding hammer. These are all useful in different stages of shaping. A good hammer should feel balanced. It should not tire your wrist too fast. It should help you move metal with control instead of brute force. Supplier guides keep listing hammers as core beginner tools because every project depends on them.
Tongs
Tongs let you hold hot metal safely. Without tongs you cannot work confidently because your hand stays too close to the heat. Beginner blacksmith kits often include tongs for this reason. In many starter setups you will want at least one solid pair for common stock sizes. Later you can add more styles as your projects grow. Blacksmith supply pages and starter kit pages both treat tongs as a true must have tool.
Vise
A vise gives you control when the metal is hot or when you need to twist bend or cut a piece by hand. For blacksmithing a post vise or leg vise is a classic choice. A bench vise can still help in a home shop for light tasks. Beginner workshop guides often include a vise or clamps because they make layout work and finishing work much easier. If you are building a home blacksmith setup then a vise is one of the most useful tools you can add early.
Punches chisels and drifts
These tools help you cut holes split metal and shape openings. Punches make holes. Chisels cut. Drifts shape and enlarge holes into the size you need. Blacksmith supply catalogs keep these in the core tool section because they are part of real forging work. They may look like advanced tools but beginners use them sooner than they expect. Even simple hooks and brackets often need one of these tools.
Quenching bucket
A quenching bucket is simple but important. It cools the work after heating. It also helps you harden some tools and keep the shop safer. Beginner setup guides often include this item because it is cheap and useful from day one. Put it close to the forge but not in the way of your hammering path. That small detail makes the shop smoother and safer.
File set
Files help you clean edges and smooth rough spots. They are especially useful after cutting and before finishing. A file set is not flashy but it saves time and improves results. Many beginner blacksmith lists include files because they help turn rough forged pieces into clean finished parts. They also help with fitting.
Angle grinder
An angle grinder is not a forge tool in the old sense. But it is one of the most helpful modern tools for beginners. You can clean scale. Trim stock. Smooth edges. And prep pieces before heating. Many beginner guides now include it because it speeds up work in a home shop. If you are building a blacksmithing tools list for getting started on a budget then an angle grinder gives you a lot of value for the money.
Best starter blacksmithing setup for a home shop
A strong blacksmithing tools list for getting started does not mean you buy everything on day one. The smart move is to build in stages. Start with heat. Then grip. Then strike. Then shape. That order keeps your spending under control and helps you learn faster. Beginner setup articles from blacksmith suppliers often recommend the same path because it works for real people with real budgets.
For a home shop the best starter order is simple. First buy the forge. Then the anvil. Then one good hammer. Then one solid pair of tongs. After that add a vise. Then add punches chisels drifts and finishing tools. This order follows how beginner workshop guides and starter kits are built. It also keeps you from buying fancy tools before you learn the basics.
The blacksmithing tools list for getting started should also match your space. A small garage shop does not need the same setup as a full bladesmithing shop. If you only want to learn hooks leaves chisels and small decorative work then a compact forge and a basic anvil setup is enough. If you plan to make larger stock or blades then you can expand later with more tongs. More hammers. More hardy tools. And stronger support gear.
What to look for in a blacksmith starter kit USA
A good blacksmith starter kit USA should save time and reduce guesswork. Many starter kits now bundle essential tools with safety gear so a beginner can start sooner. That is why starter kit pages from major blacksmith suppliers keep selling bundles instead of random loose parts. The best kit is not the one with the most items. It is the one with the items you will actually use.
When you compare a blacksmith starter kit USA look for these things. A usable forge. At least one hammer. Proper tongs. A way to quench metal. And enough support gear to work safely. Some kits also include aprons or other protective items. That matters because beginners often focus on forging but forget safety. A smart kit solves both problems at once.
If you search for blacksmith tools for sale you will see many options. Some are bare bones. Some are premium. Some are more useful for knife making. Others are better for general forging. Read the tool list carefully. A good starter pack should match your goals. If you only want a simple beginner forge kit then do not pay for tools you will not use this year.
Affordable blacksmith tools that still work well
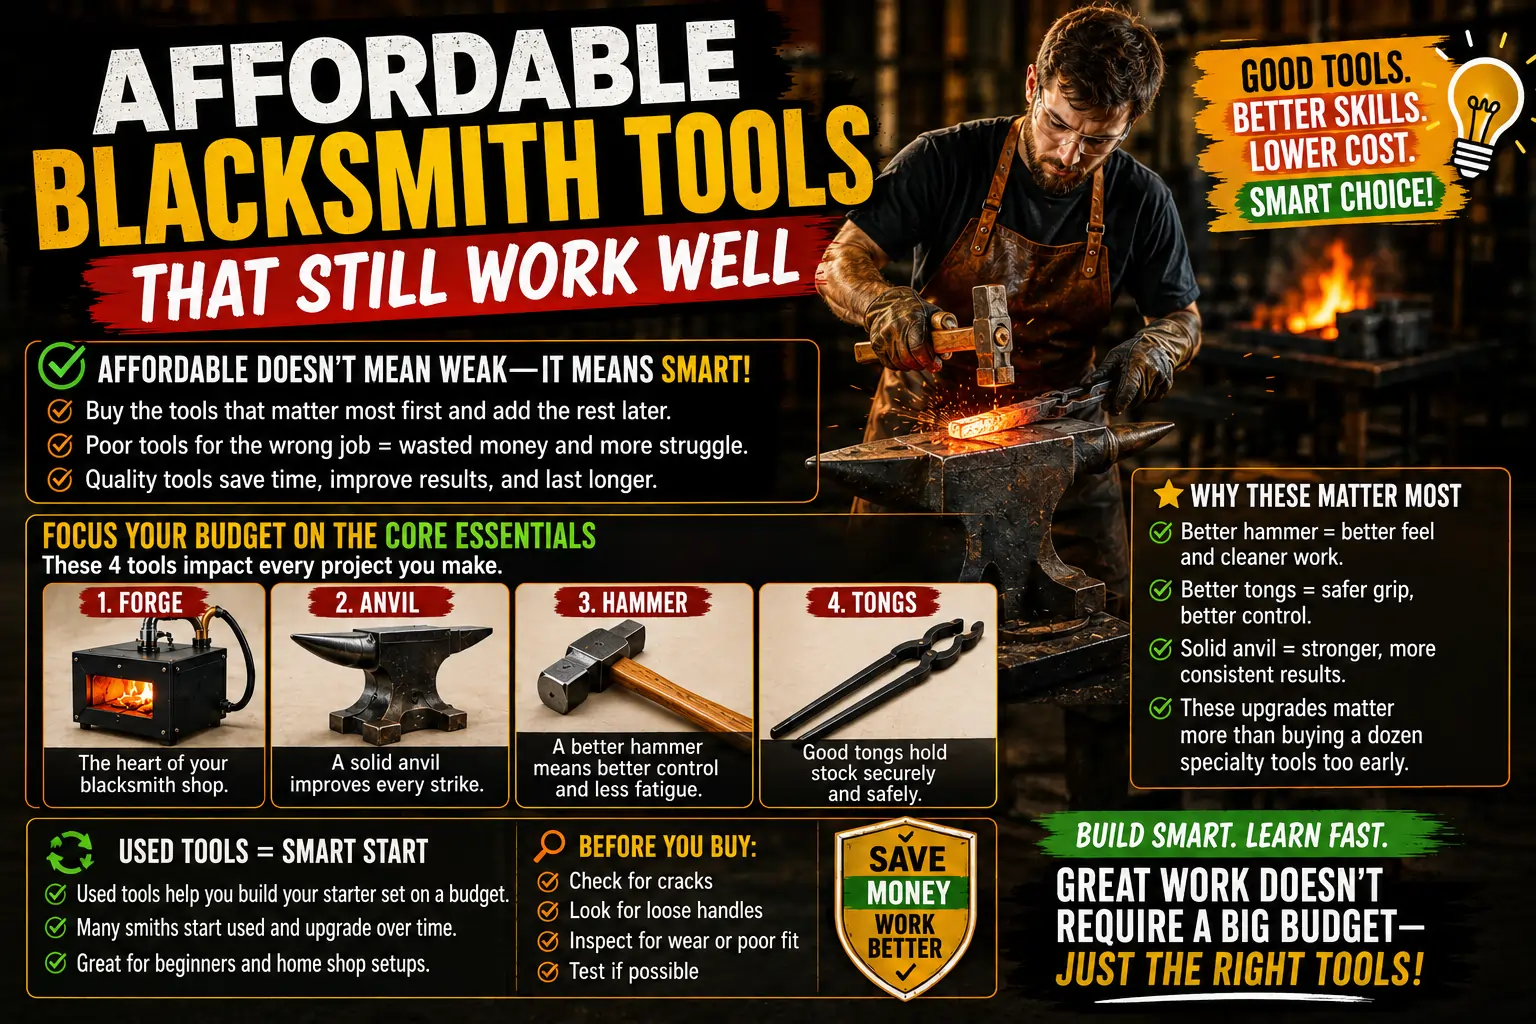
Affordable does not mean weak. It means smart. The best way to save money is to buy the tools that matter most first and add the rest later. Blacksmith supplier pages and beginner guides both warn against buying poor tools for the wrong job. A bad hammer or weak tongs can slow you down and make the work feel harder than it should.
If you want affordable blacksmith tools then focus your budget on the forge anvil hammer and tongs first. These are the items that affect every project. A better hammer will feel better in your hand. Better tongs will hold stock more securely. A solid anvil will improve every strike. Those three upgrades matter more than buying a dozen specialty tools too early.
Used tools can also help you build a blacksmithing starter set without spending too much. Many smiths begin with used gear and add new tools later. That approach works well for a home blacksmith setup because it lets you stay inside budget while still learning on real equipment. Just inspect the tools for cracks loose handles and poor fit before you buy.
Blacksmithing supplies that make the work easier
A complete blacksmithing supplies list is bigger than the main tools list. You also need leather gloves or apron style protection. Eye protection. Fuel. Replacement handles. Wire brush. Marking tools. And simple shop cleanup items. Beginner starter kits often include some of this gear because new smiths need a safer first setup.
You should also keep basic shop support items nearby. A sturdy workbench. Good lighting. A clean floor. And a place to store hot and cold tools. These items may not look like part of the blacksmithing tools list for getting started but they change how well your shop works. A neat space helps you stay focused. It also reduces mistakes.
If you are checking blacksmith tools near me then local farrier shops metal supply stores and blacksmith groups can sometimes help more than a random online listing. You can often see the tool in person. Feel the weight. Check the fit. And ask questions before you buy. That is useful when you are building your first setup and do not yet know your own preferences.
What tools do you need for blacksmithing?
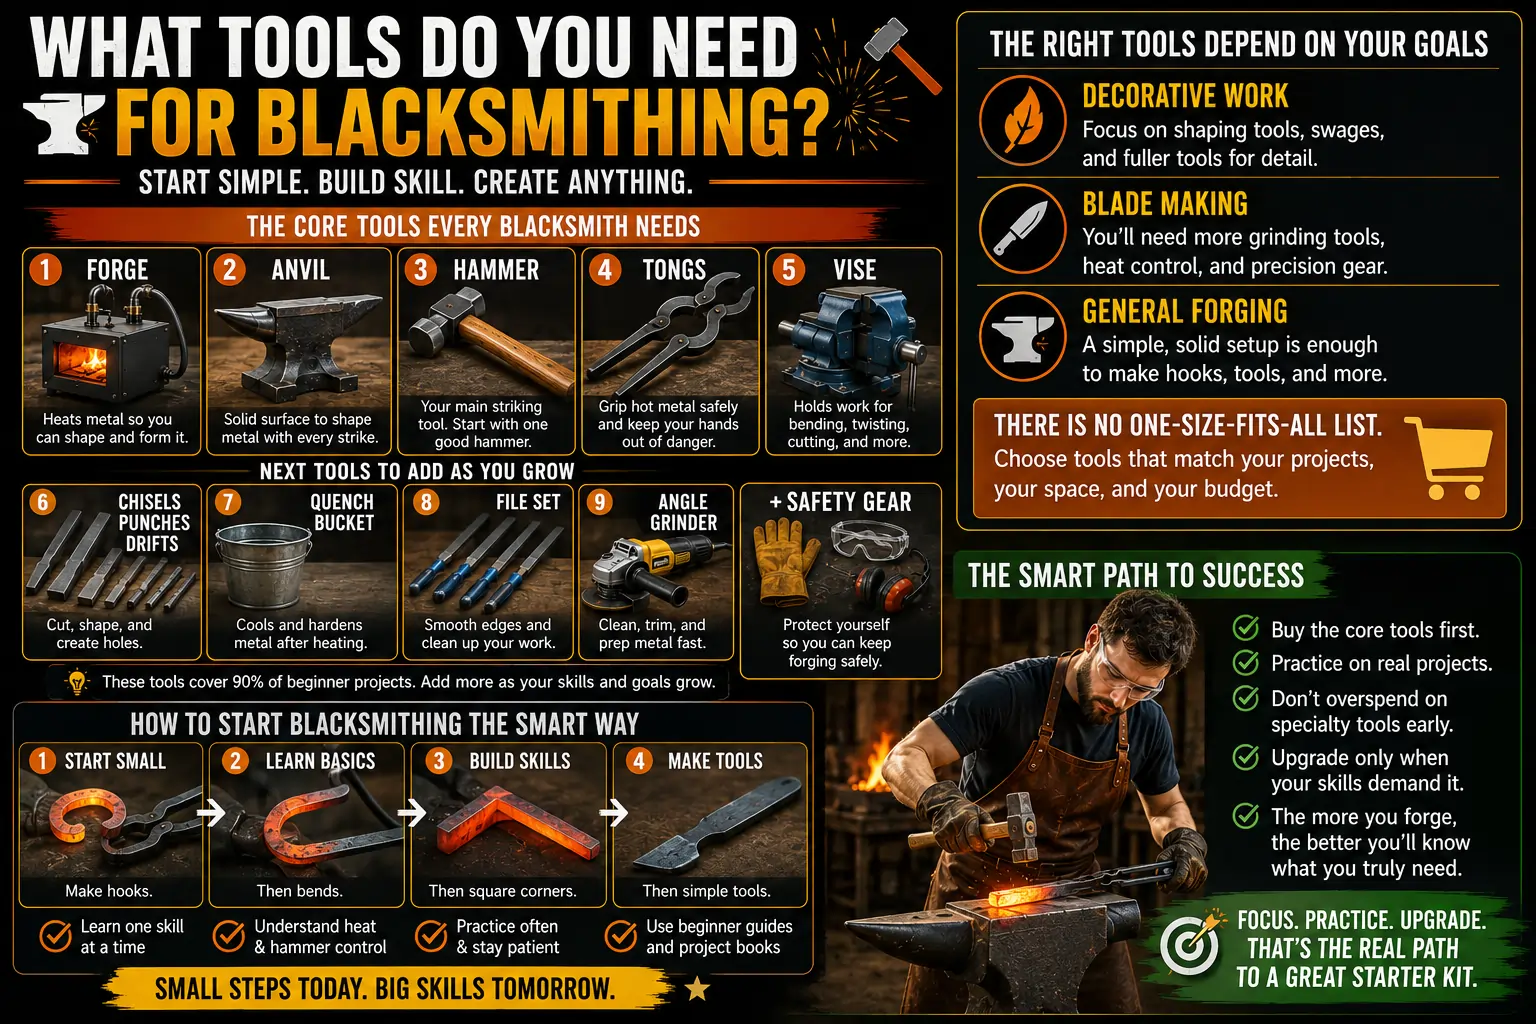
The short answer is simple. Start with a forge. Add an anvil. Add a hammer. Add tongs. Add a vise. Then add chisels punches drifts a quench bucket files and a grinder as your projects demand them. That is the core of what tools do you need for blacksmithing and it matches what current beginner guides and starter kits keep recommending.
The deeper answer is that your tool list should match the kind of work you want to do. If you want decorative work then you may need more shaping tools. If you want blades then you may need more grinding and heat control. If you want general forging then a smaller and simpler kit is enough. This is why the best blacksmithing tools list for beginners is not one fixed shopping cart. It is a smart starting path.
How to start blacksmithing the smart way
The best way to how to start blacksmithing is to begin small and learn one skill at a time. Make hooks. Then bends. Then square corners. Then simple tools. This keeps you from wasting material and helps you understand heat control and hammer control early. Beginner project books and workshop guides exist for this reason. They help you practice the craft in a safe order.
Do not try to build a giant workshop before you have basic skills. Many new smiths spend too much on specialty tools and still cannot make clean simple shapes. A better plan is to buy the core tools first and practice often. The more you use your setup the better you will understand which tools deserve the next upgrade. That is the real path to a good blacksmith starter kit.
FAQ’s
Q1. What is the most important tool for a beginner blacksmith?
The forge is the first major tool because it heats the metal. After that the anvil hammer and tongs become the next must haves. That order appears again and again in beginner guides and starter kit pages.
Q2. Can I start blacksmithing with a small budget?
Yes. A small budget can still work if you buy the core tools first and skip extra specialty gear. Many guides advise buying used where possible and focusing on the tools you will use every week.
Q3. Is a blacksmith starter kit worth it?
For most beginners yes. A good kit saves time and reduces mistakes because it bundles the basic items you need. The best kits include practical tools and sometimes safety gear too.
Q4. Do I need a post vise for a home blacksmith setup?
A post vise is very helpful but not the first thing to buy if your budget is tight. It becomes more useful once you start twisting bending and cleaning up hot stock. A bench vise can still help for lighter shop work.
Q5. What should I buy after the basic blacksmithing tools list for getting started?
After the basics add more tongs. More hammer styles. Punches. Chisels. Drifts. Files. A grinder. And better safety gear. Add them in the order your projects demand them. That keeps your shop lean and useful.
Conclusion
The best blacksmithing tools list for getting started is not the biggest list. It is the smartest one. Begin with the forge. Add the anvil. Then the hammer and tongs. After that build out your vise punches chisels drifts quench bucket files and grinder. This approach gives you a practical beginner blacksmithing setup that works in a real home shop. It also keeps your budget under control while you learn the craft step by step.
If you keep your focus on the core tools first you will learn faster and waste less money. That is the real value of a good blacksmithing tools list for getting started. Start simple. Practice often. Upgrade only when your projects demand it. That is how a beginner becomes a confident smith.